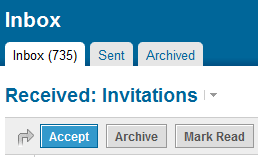
 LinkedIn has been making changes to their interface and one thing I noticed back in March is that I could no longer select multiple invitations to connect and accept them all at once from the main inbox page.
It took a little bit of exploring the new inbox interface and functionality before I figured out how to be able to bulk accept LinkedIn invites like I had grown accustomed to. Then the other day I was on Twitter and I had made a comment about bulk accepting LinkedIn invites and received a number of responses from people asking how to do it.
I had assumed everyone knew how to select and accept multiple invitations to connect – but you know what they say about assumptions…
So – I’m here to show you 2 different ways of bulk accepting invitations to connect on LinkedIn.
Method #1
Navigate to your inbox.
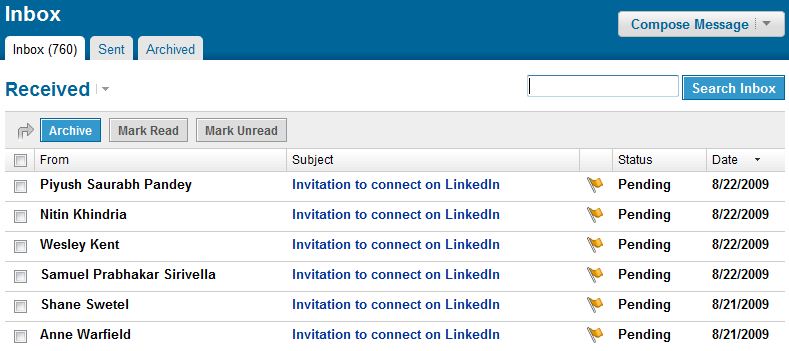
Hover your mouse over “Received” and a drop down menu opens up and you can select “invitations.”
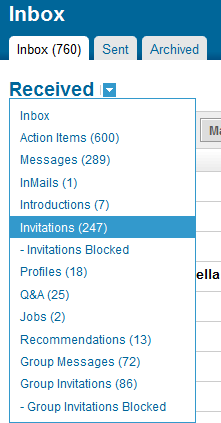
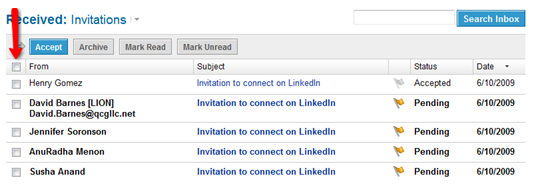
Once you select “invitations,” you will be taken to all of your invitations to connect, and this is where you can select the entire list if you like:
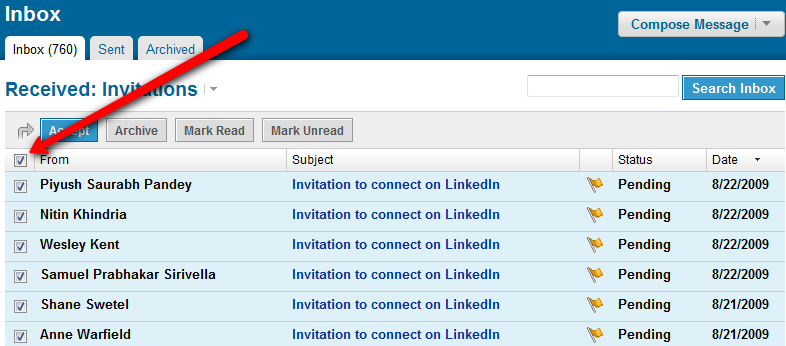
Then simply click the blue “Accept” button to accept all selected invitations to connect. After you accept the invitations you’ve selected, you’ll be taken to a page showing you’re the connections you just added.
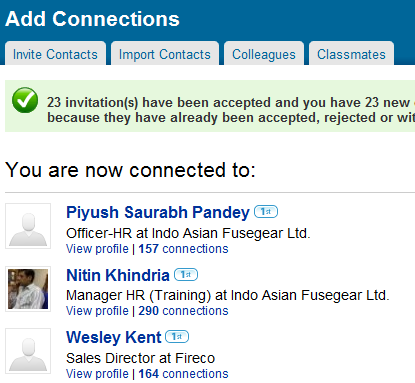
Here’s the trick that many people miss – you have to scroll all the way down to the bottom of the list of the people you just connected with and click on the tiny “See your other invitations” – which, if you’re not paying careful attention, you can easily miss.

Am I the only person that thinks it’s a little weird that they tucked this so far out of the way?
Once you click on “See your other invitations,” you’ll be taken back to page 1 of your inbox of invitations, which have likely all been accepted. Now you have to scroll down to the bottom of the page to click on page 2 of your invitations in order to see other invitations to connect that you have not processed yet. Alternatively, you could bulk “archive” all of the invitations you just accepted, and then your “pending” invitations from page 2 would advance to page 1.

Once you get to page 2 – simply repeat the process of selecting the invitations you would like to accept, click accept, then scroll down to the bottom of the page of all of the people you just connected to and click on “See your other invitations,” and go to page 3, and so on.
Method #2
From the home page, you can “take action” on an invitation to connect:
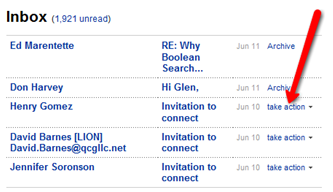
Once you accept an invitation to connect in this fashion, you are taken to the “Add Connections” page where you can see the person whose invitation to connect you just accepted. You’ll have to scroll down to the bottom of the page to find and click on “See your other invitations.” If I didn’t know better, I’d think that LinkedIn was trying to hide this.
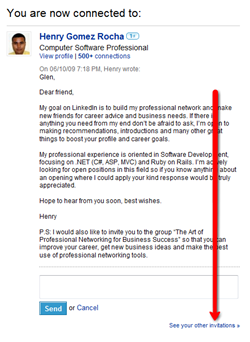
Once you click on “See your other invitations,” you’ll be taken to your inbox of received invitations, where you can repeat the cycle detailed in method #1 above of: selecting the invitations you would like to accept, clicking accept, then scrolling down to the bottom of the page of all of the people you just connected to and click on “See your other invitations,” and go to page 2, 3, and so on.
So if you didn’t already know how to easily bulk accept LinkedIn invitations to connect, now you do. LinkedIn’s changes certainly added more steps to the process than the original process, and likely on purpose – but that’s a topic for another post.
I think it’s poor functionality to be taken back to page 1 of your received invitations every time you accept a batch of invites – not sure what the thought process was there and why you’re not automatically taken to the next page of unprocessed invitations to connect, but I’m not a user interface designer @ LinkedIn, so what do I know?
If you’d like to see a video that details most of method #1, you can view Jonathan Duarte’s how-to video here. Nice work Jonathan!